A Shared Device Mode settings in SureLock offers a facility of using a single device by multiple users which results in flexibility and cost reduction.
42Gears now offers a Shared Device Mode Settings with Azure AD on the SureLock Kiosk Lockdown. This results in a single configured device that can be used by multiple users at different times. Each user will have unique login access to the device and will be able to access only assigned applications and device settings. Each profile will be governed by predefined admin settings policies for easier management.
Purpose:
The purpose of the article is to provide steps on how to configure Shared Device Mode Settings in SureLock with Azure AD.
Prerequisites:
- Should have admin access to Azure Portal, where the Azure AD users are created.
Steps:
- SureMDM agent app registration in Azure portal.
- Configure Shared Device Mode.
- Create different SureLock settings for different users using Profile Management.
- Grant admin consent for 42gears in Azure Portal.
1.Register the SureMDM agent app in the Azure portal:
It is required to register any application in the Azure portal to have it integrated with any third party service to achieve the integration of Azure Users login on a shared device mode. By registering the app, it would provide secure access to Microsoft services, other Microsoft APIs.
- Login to Azure portal
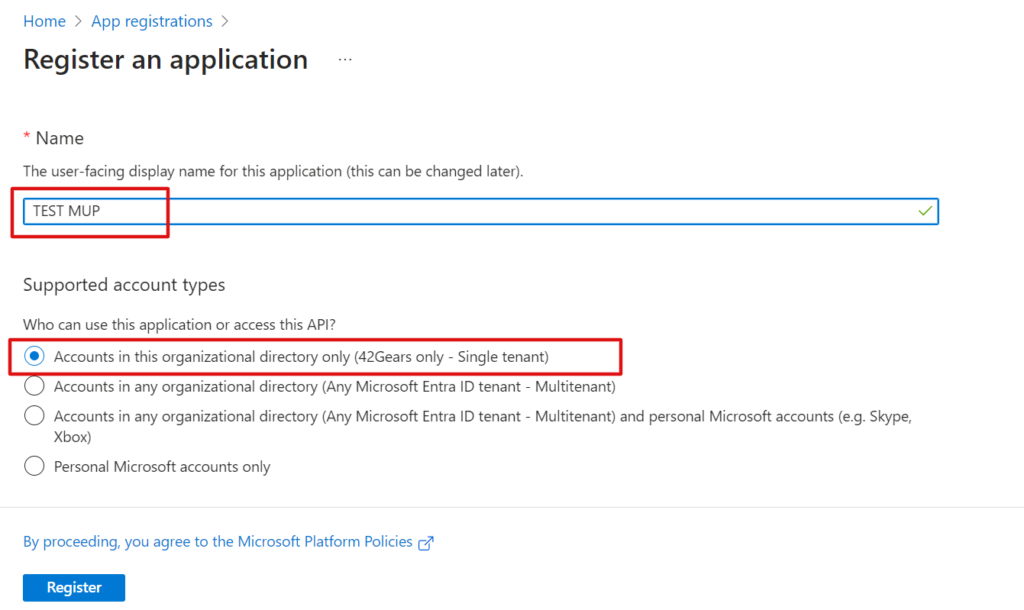
- Look for App registration > New Registration > Give the name for new App > Click on Register

3. Select Supported account types as Accounts in this organizational directory only (42Gears only – Single tenant) and click on Register.
4) Click on Authentication > Add a platform.
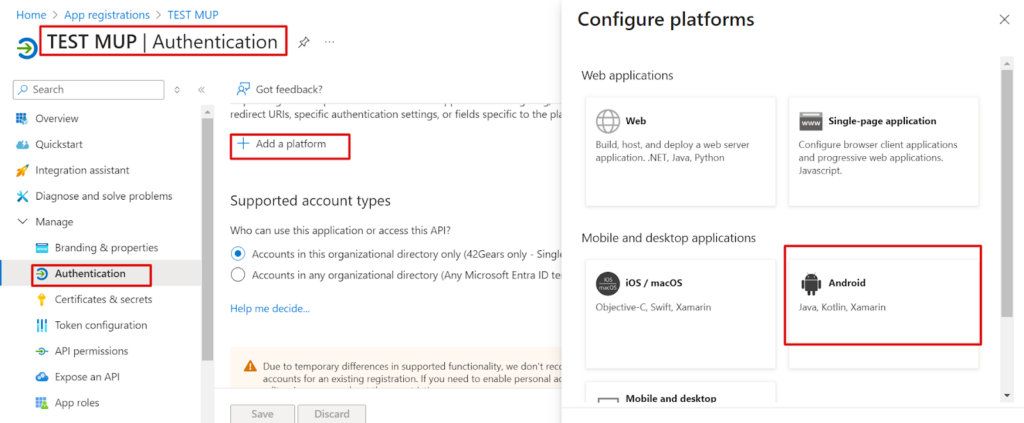
5. Add a Platform > Android > Add the package name as com.nix.
NOTE : For Signature Hash please reach out to Techsupport@42gears.com.
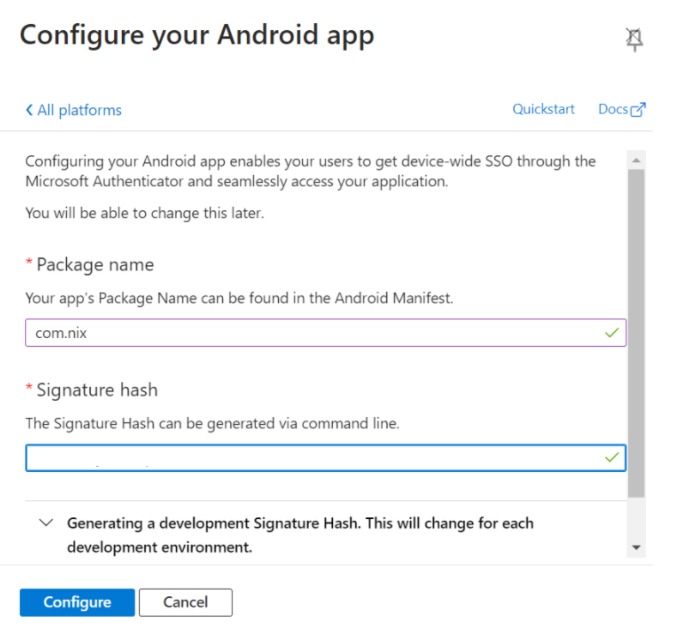
6. Click on Configure and Click Done.
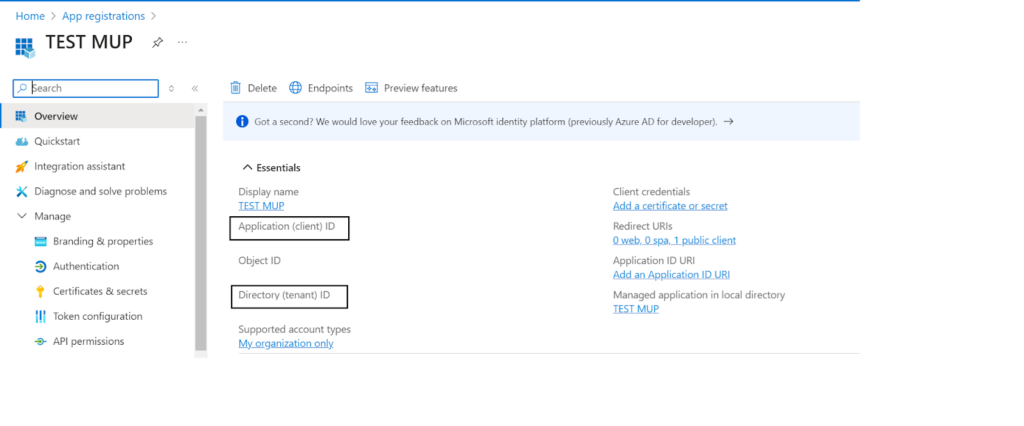
7. Admin can use the Application (client) ID and Directory (tenant) ID of this application in the shared device mode settings of SureLock.
2.Shared Device Mode configuration steps:
- Install and launch SureLock.
NOTE : It can be Integrated SureLock if the devices are enrolled in SureMDM. If the devices are not enrolled in SureMDM it can be standalone SureLock. - Tap 5 times on the screen and enter the password to access the SureLock Admin settings.
- Install Microsoft Authenticator app and keep it as a hidden app in the SureLock.
Below video depicts the steps as how to add Microsoft authenticator to hidden apps. (The app should be installed on the device)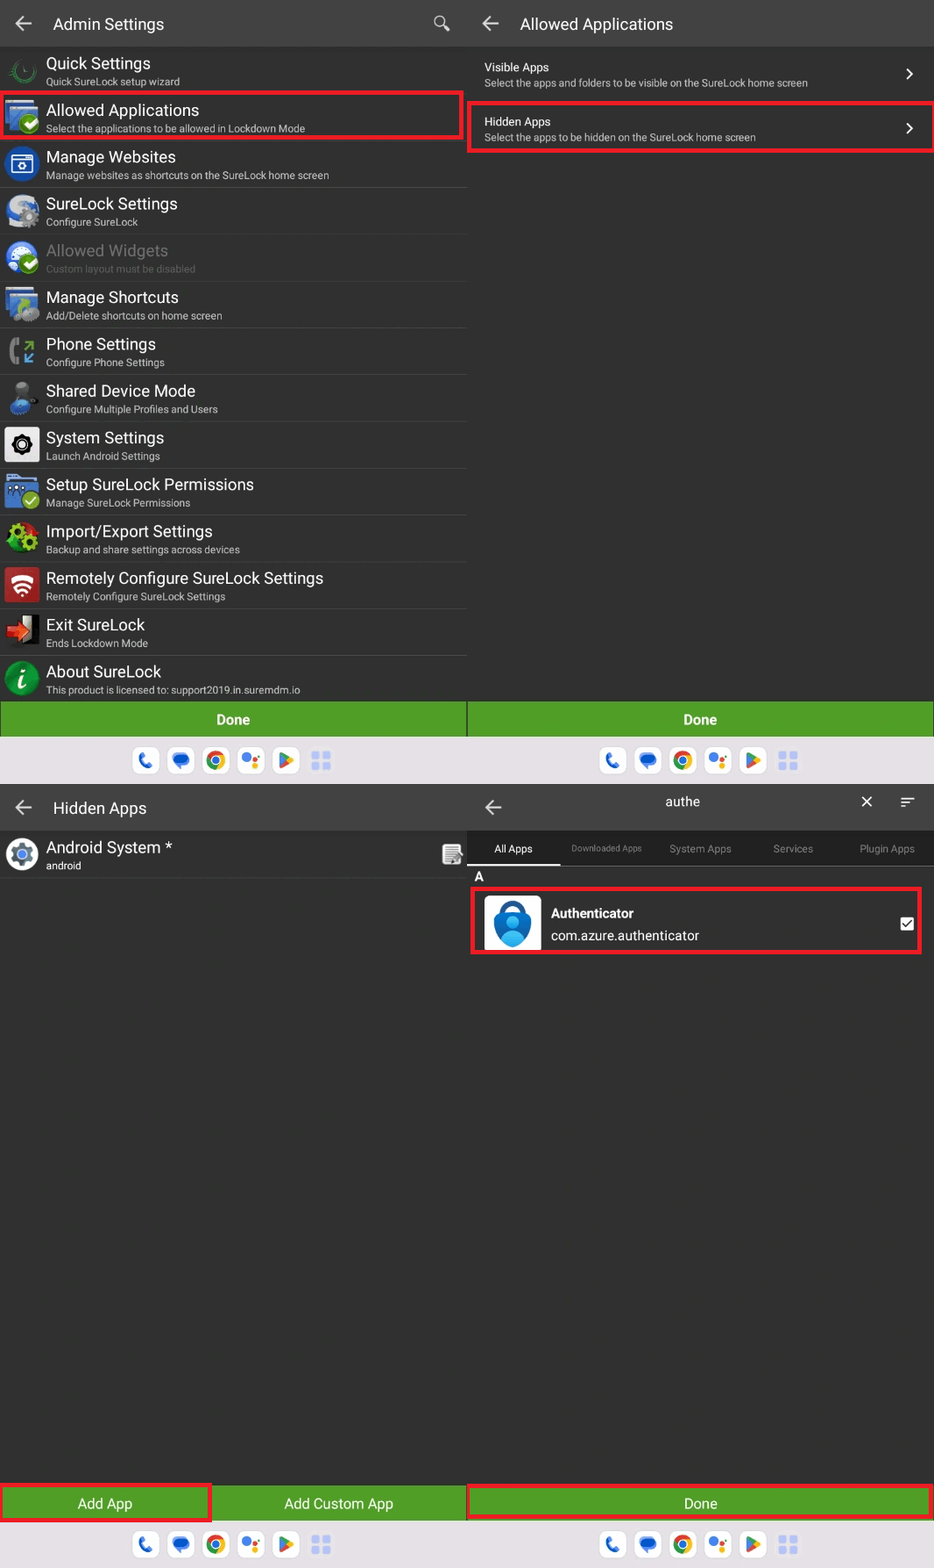
- Now, go to the SureLock Settings and navigate to Shared Device mode.
- Enable the Shared Device mode and tap on User Authentication.
- In the Server Configurations, select Azure AD as the server from the list.
Note: The admin needs to have an active Azure account with Azure AD users created. - Further, the admin needs to input the Client ID and Tenant ID (fetched from the Azure AD portal, follow the steps mentioned in pointer 7 of Register the SureMDM agent app in the Azure portal) in the designated fields on the device and the corresponding Profile Meta Tag should also be entered.
NOTE : Meta Tag is key-value pairs that describe resources in your Azure portal.

For example “ businessPhones, displayName, givenName,id, jobTitle, mail, mobilePhone, officeLocation, preferredLanguage, surname, userPrincipalName, employeeId” . These Meta Tags have to be used as it is mentioned here. - On the same screen of Server Configuration check the option “ Enable Single Sign On ”.
- Once all the required data is entered click on the Validate button.
- Further, it will prompt the user to enter the Azure login credentials and give an Authentication Successful message upon entering the valid credentials.
Note: If the credentials are wrong, it shows an Authentication failed message. - Now, click on Save.
Below video depicts the steps as how to prepare the Server configurations for Shared Device Mode.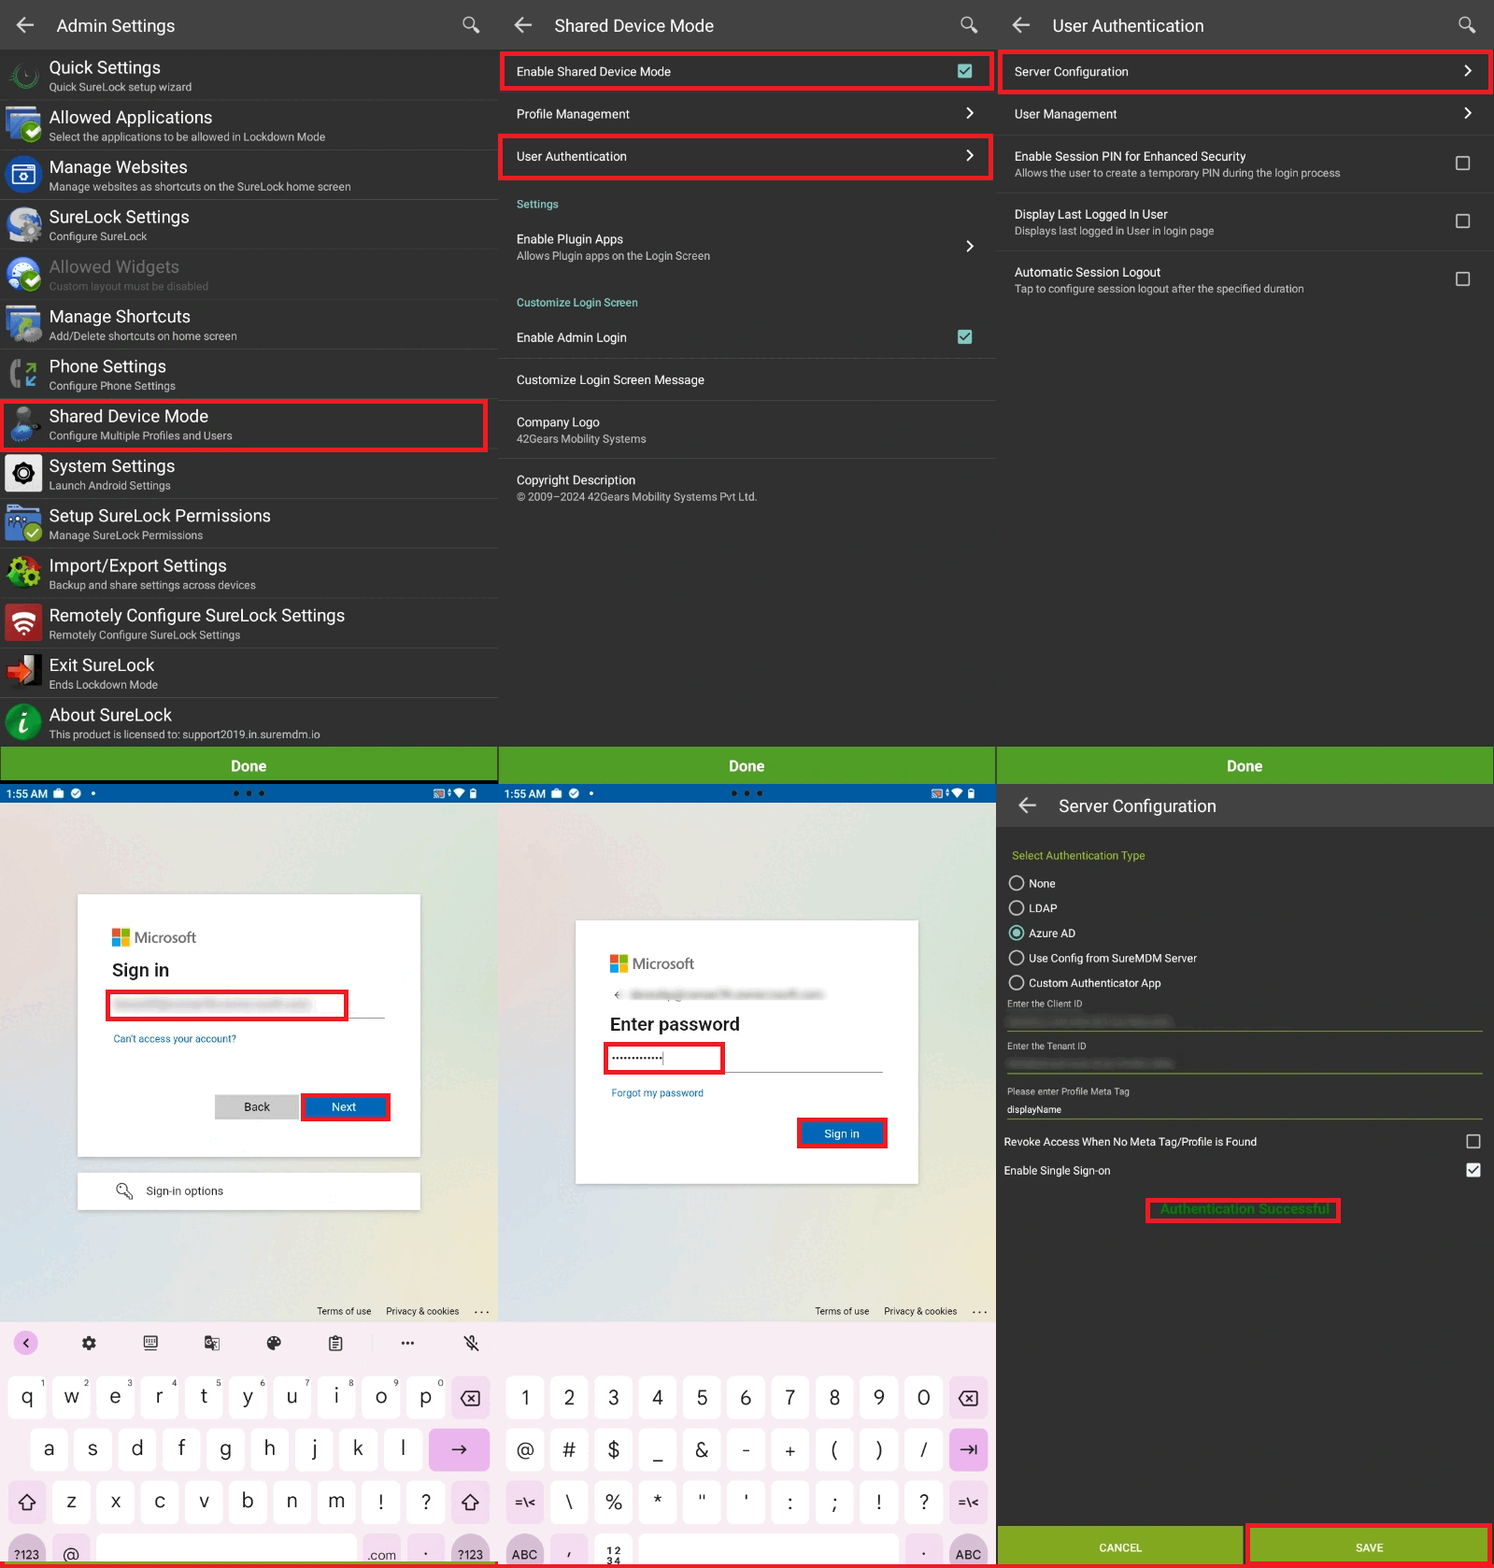
3.Create different SureLock settings for different users using Profile Management :
The purpose of Profile management is that, when you have multiple users logging into the same device and you would like to have a different SureLock settings activated for each individual user, we can make use of Profile Management and configure the settings. Based on the Meta tag defined and logged in user the corresponding SureLock settings gets applied on the device.
- Install and launch SureLock.
- Tap 5 times on the screen and enter the password to access the SureLock Admin settings.
- Go to the SureLock Settings and navigate to Shared Device mode.
- Click on Profile Management and create a Profile with the name corresponding to the Meta Tag key defined. ( As defined in the step 7 of Shared Device Mode configuration steps )
- After creating the profile, set the individual profile to activate state. And configure the SureLock settings as per the requirement.
Note: If the corresponding profile is not created, the default profile should be launched. And if there is only one profile that needs to be applied for all the users logged into the SureLock, then no need of creating multiple profiles. - Now, click on Done to go back to the SureLock Home screen.
- Tap on the LAUNCH button to login and enter the Azure AD credentials.
- A Profile corresponding to the Meta Tag value will get launched.
- The user can log out by clicking the Back button from the home screen.
Below video depicts the steps as how to add Multiple users using Profile Management in SureLock.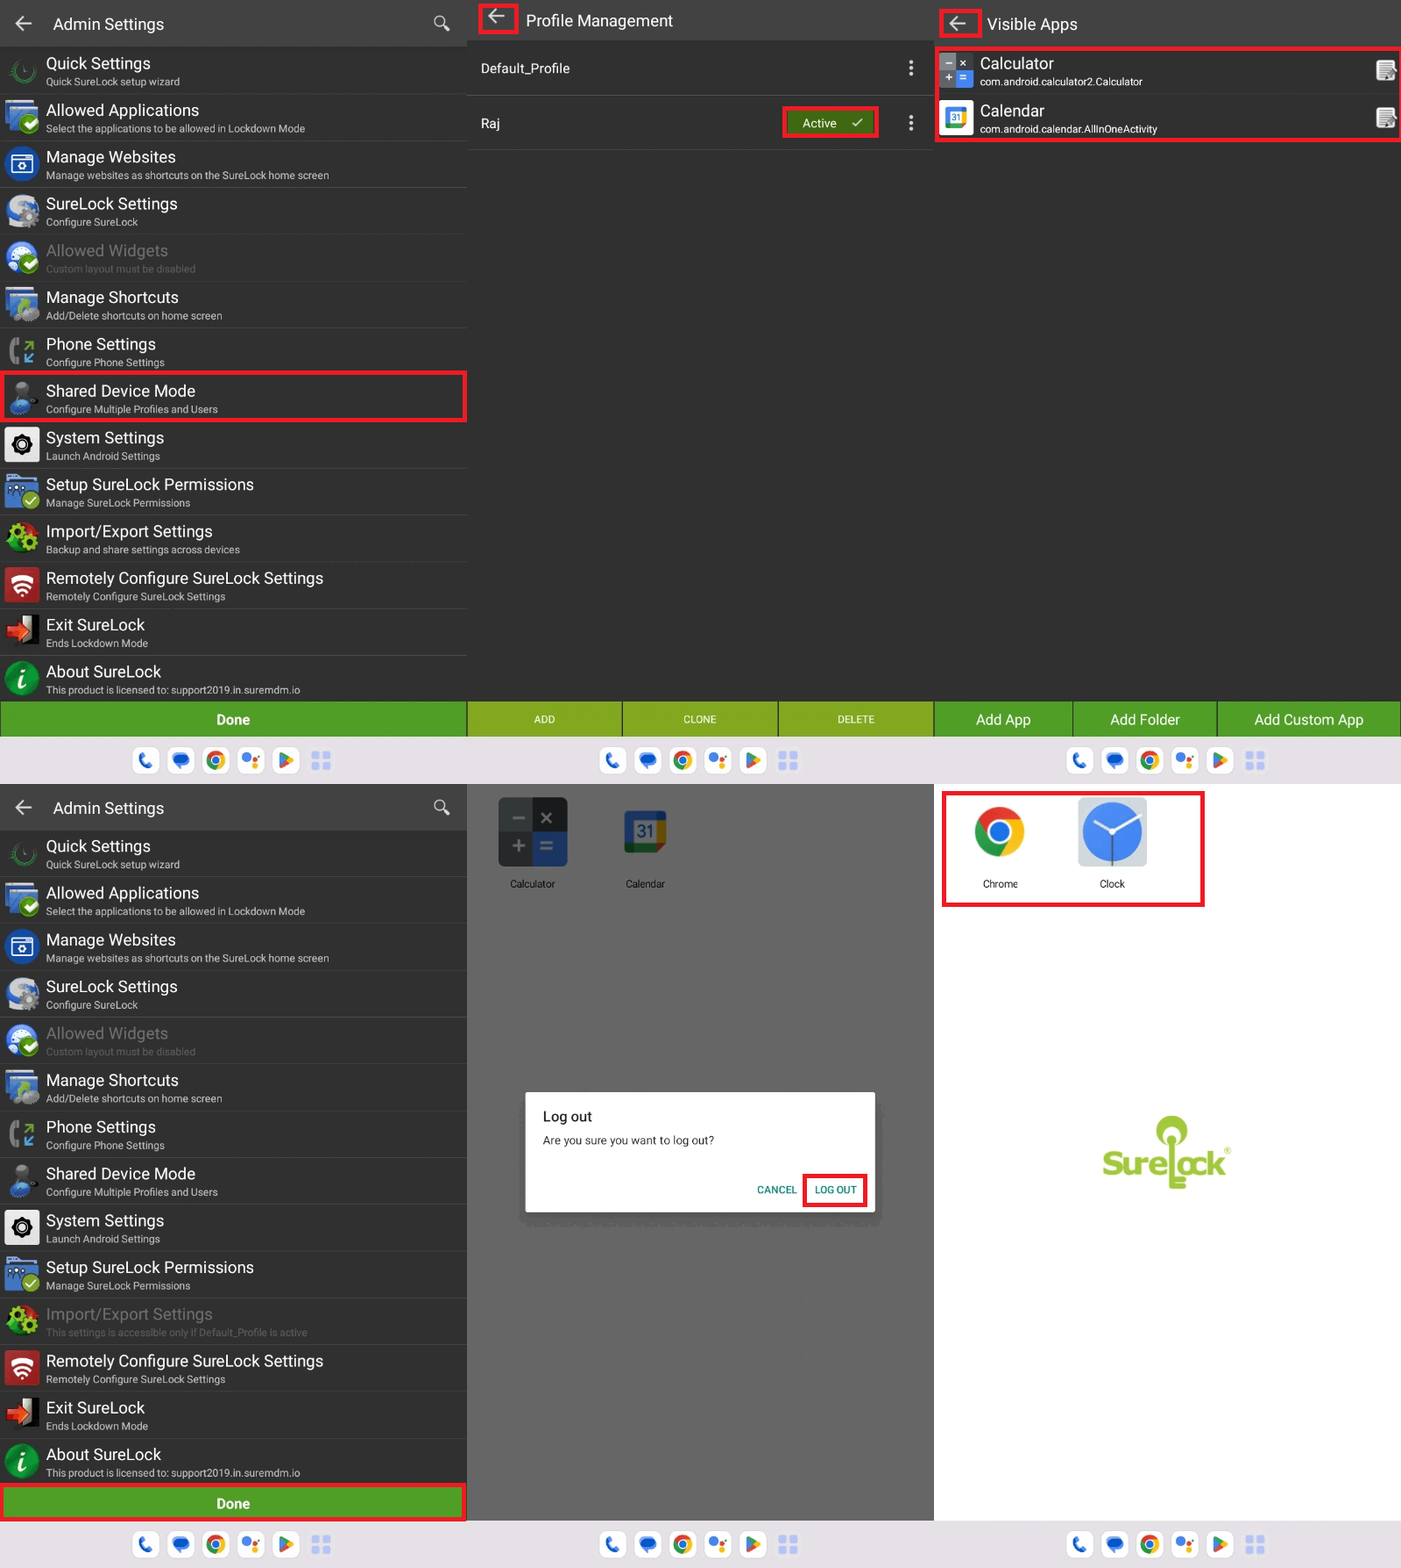
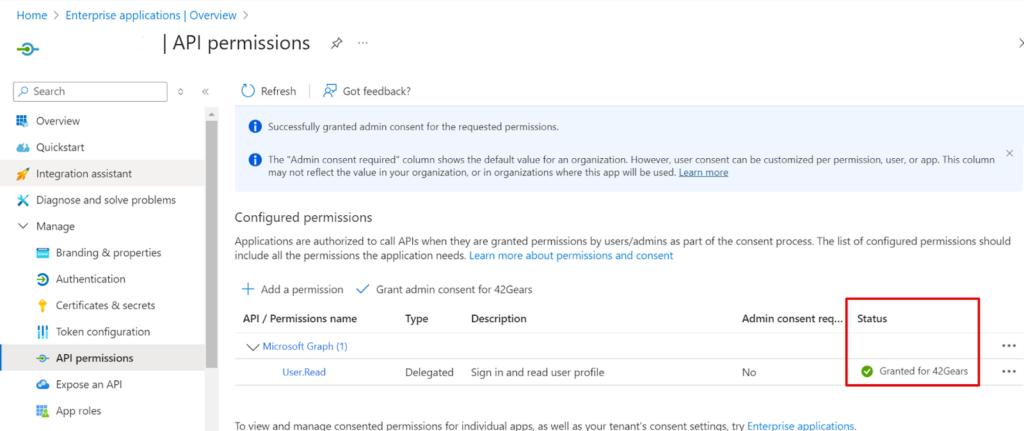
4.How to Grant admin consent for 42gears:
Before an application can access your organization’s data, a user must grant the application permissions to do so. Different permissions allow different levels of access. To reduce the risk of malicious applications attempting to trick users into granting them access to your organization’s data, we recommend that you allow user consent for 42Gears app.
- Login to https://portal.azure.com
- Navigate to Microsoft Entra ID > Enterprise Applications.
- Select the 42Gears Application we have registered as a required application .
- Select the option Permission and click on Grant admin consent for 42gears.
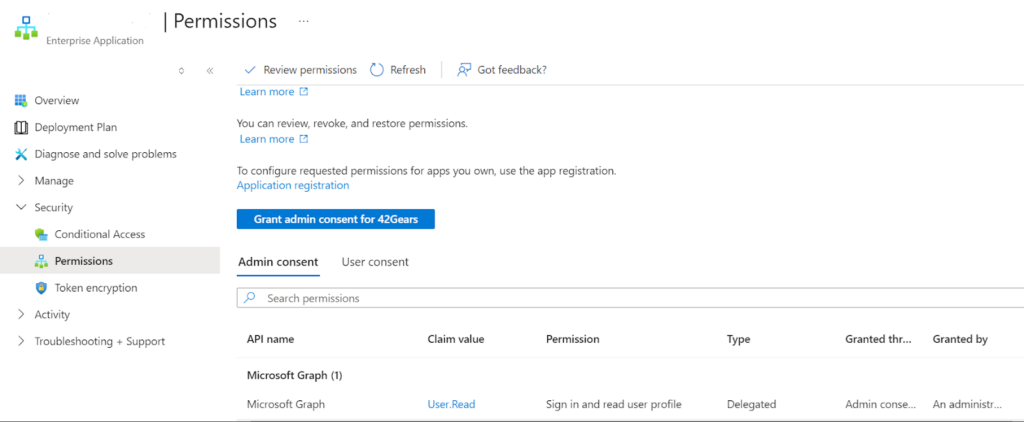
5.Navigate to API permission, verify if the status is green check with the message granted for 42Gears.
Additional Information:
- The user needs to enter the credentials every time he taps on the Launch button to Sign In on the SureLock Home Screen.
- If the meta tag and values do not match while logging into the SureLock, then the default profile will be launched upon logging in.
Need help?
