
Locking apps helps the administrator restrict the access and usage of the app that is installed on Windows machines.
At the same time, admins can also allow specific apps to be used if they are locked.
Here in SureMDM, admins can make use of the policy called App Locker for Windows in order to lock access to any specific apps.
Purpose
The purpose of this knowledge article is to provide a guide on how to allow or deny the locking of specific apps on Windows machines via the SureMDM profile policy.
Prerequisites
NA
Steps
The below steps should help in allowing or blocking the apps via the SureMDM app locker policy:
- Log into the SureMDM console, click Profiles.
- On the Profiles screen, select the Windows platform and click Add.
- Select the App Locker and click on Configure.
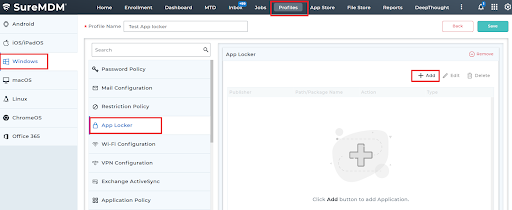
4. Enter a profile name and click Add. The below page would be displayed.
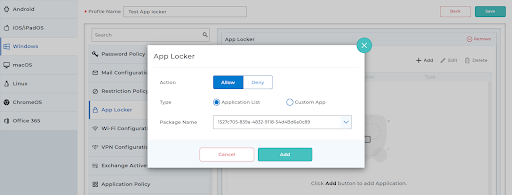
5. Configure the App Locker settings and click Add and then Save the profile.
There are a few settings that you need to configure in order to lock or allow the application.

Action: Allow or Deny the locking of specific applications on the device.
Type: Select the type of file from the following options:
- Application List: This would give you a list of apps that are added to the SureMDM app store and the apps installed on the Windows enrolled in SureMDM to choose from.
- Custom App:
- Store Apps
- Exe
- MSI
- Script
- Condition: This option pops in when you choose Custom App as Type. Select Publisher or Path.
- Path: Enter the path of the file located on the machine. You could get it under any app property. Right-click on any app > Properties (see attached sample example below).

- Publisher: Enter the name of the publisher. (You could find it in the applications list from Control Panel > Programmes > Programmes and Features.)
- Package Name: Enter the package name. You can find it on the SureMDM console under the Dynamic Apps list. (See attached sample example below.)

- Binary Name: Enter the binary name of the app. (Should be the app name from the dynamic apps list.)
The newly created profile will be listed in the Profiles section.
6. Go back to the Home tab and select the Windows device(s) or group.
7. Click Apply to launch the Apply Job/Profile To Device prompt.
8. In the Apply Job/Profile To Device prompt, select the created profile and click Apply.
Need help?