
Partial settings is a settings file where a specific configuration that the admin wants to update over the existing or running configuration on the devices. SureLock offers the facility to import the configuration that will update a part of the existing settings on the devices instead of modifying the whole configuration. Below are the steps to create and deploy the partial SureLock settings.
Purpose
The purpose of this knowledge article is to provide a guide on how to create and use the SureLock partial settings.
Prerequisites
NA
Steps
Step 1: Creating a partial Settings file from the SureMDM console
- Login to the SureMDM console and navigate to the Jobs section.
- Click on the New job and select the Android platform.
- Further click on the SureLock Settings job.
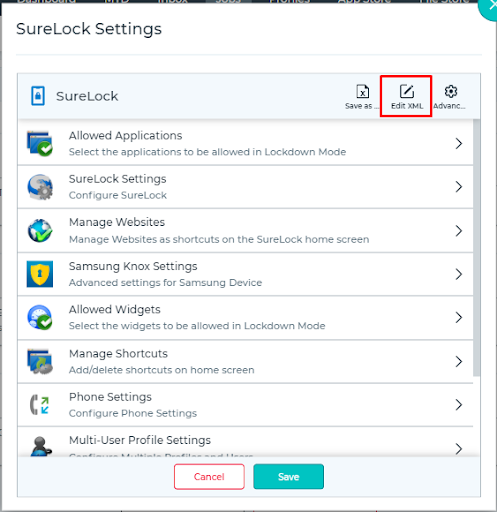
- On the SureLock settings window, click on the Edit XML button which will give the template of the SureLock configuration.
- Copy the content to a Notepad and update the configuration as required by removing the unwanted setting tags.
- Once the changes are done, update the mode from strict to partial.
- Save the settings with the .settings extension.
Note: Make sure the changes are present within the opening and closing tag(<surelock>) as shown in the below example
<?xml version=’1.0′ encoding=’utf-8′ standalone=’yes’ ?>
<surelock platform=”ANDROID” version=”2″ productdetail=”Device Model : TC56, Android OS : 27, Product Name : SureLock, Product Version : 21.02006, Package Name : com.gears42.surelock” actPrefIdType=”-1″ forceActivateLicense=”false” settingIdentifier=”” settingIdentifierSuffix=” ”mode=”partial” iconScaleValue=”288″><!–modes: strict, flexible, partial–>
<filterapplications screenresulution=”295.563X294.967″ mergeapplications=”false”>
<application>
</appliction>
</filterapplications>
<settings>
</settings>
</surelock>
Step 2 : Applying the SureLock partial settings job to the devices.
- Login to the SureMDM console.
- Navigate to the Jobs > New job.
- Select Android platform and choose the File Transfer job.
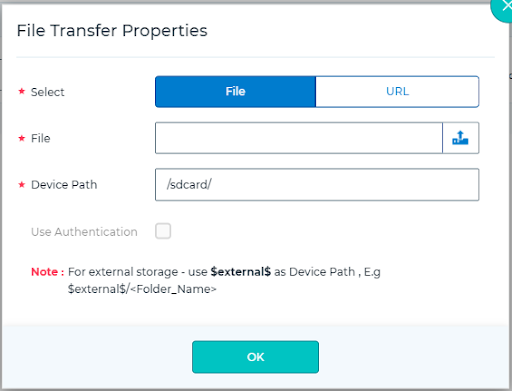
- Upload the SureLock.settings partial setting file and Save it with a name.
- Go to Home and select the device(s) to update the SureLock partial settings and click on Apply.
- Select the job name created in step No. 5 and click Apply.
Need more help? Here’s how to get help from our experts.