
Overview
AstroContacts is a centralized contact management solution that enables administrators to create and manage a shared phonebook across all managed devices. This article provides step-by-step instructions on how to create individual contacts, invite users to the AstroContacts application, and import contacts in bulk using the AstroContacts Admin Portal.
Prerequisites
AstroContacts Portal
Steps
A. Creating a Single Contact
To manually add an individual contact to the shared phonebook:
- Log in to the AstroContacts Admin Portal.
- Navigate to Contacts from the left-hand navigation menu.
- Click Add from the top toolbar.
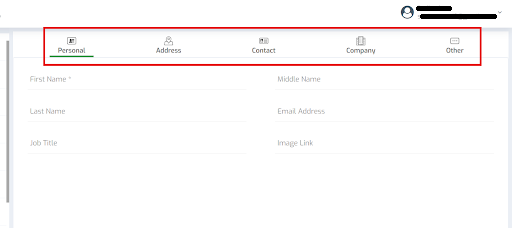
- Enter the required information in the following sections:
- Personal Details
- Address Details
- Contact Details
- Company Details
- Other Details
- Refer to the screenshot below:
- Click Save to create the contact.
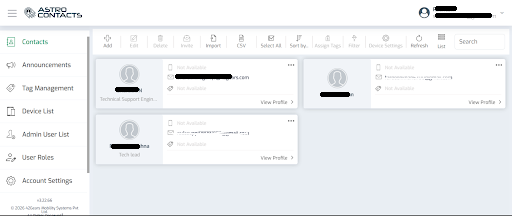
The newly created contact will be displayed in the Contacts list.
Refer to the screenshot below:
B. Inviting Contacts to the AstroContacts App
Creating a contact in the Admin Portal does not automatically grant the user access to the AstroContacts mobile application. The contact must be invited separately.
To invite a contact:
- Navigate to the Contacts list.
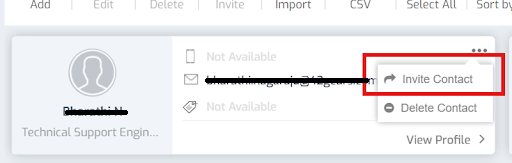
- Select the contact(s) you want to invite.
- Click Invite from the toolbar as shown below:
The selected user(s) will receive an invitation email containing either a QR code, or login credentials to access the AstroContacts application on their mobile device.
Note:
If the invitation email is not received, ask the user to:
- Check their Spam/Junk folder.
- Verify whether their organization’s email security policies are blocking emails from @42gears.com.
C. Bulk Importing Contacts
For organizations managing a large number of contacts, AstroContacts supports importing contacts using CSV (.csv) or VCF (.vcf) files.
To import contacts in bulk:
- Navigate to Contacts.
- Click Import (available under the toolbar or More menu, depending on your portal version).

- Upload the .csv or .vcf file containing the contact information.
- Map the fields in the uploaded file (such as Name, Phone Number, and Email Address) to the corresponding AstroContacts fields.
- Click Import to begin the import process.
Once the import is complete, the contacts will be available in the shared phonebook.
Result
After completing the above steps, contacts will be successfully added to the AstroContacts Admin Portal. Administrators can then invite users individually to access the AstroContacts application or manage the contacts as required.
Need more help? Here’s how to get help from our experts.
CONTACT US