The faster you get new equipment up and running, the more quickly you can achieve your return on investment. With Zebra’s Android Printer Setup Utility, configuring your Link-OS printers to optimize performance is easy – no specialized knowledge is required.
Purpose
The purpose of the article is to provide a guide on how to Pair, Connect, and Configure a Zebra Link-OS Printer using the Zebra Printer Setup Utility Application.
Prerequisites
- Ensure that the Android device, Printer, and System are constantly connected to the same Wi-Fi network.
Steps
Step 1: To pair the Zebra Printer to any Android Phone via Bluetooth
- Turn on the Zebra Printer.
- Press and hold the Feed button for five seconds until Bluetooth blinks up in the Zebra Printer.
- Turn on Bluetooth on any Android device and select Zebra Printer from the Bluetooth list.
- Tap on Pair on the phone, and parallelly, tap on the Select button from the Zebra printer.
- Now the device is paired with the Zebra printer via Bluetooth.
Step 2: Connect the Zebra Printer to any Android device via Bluetooth
- Install the Zebra Printer Setup Utility from the Play Store.
- Launch the Zebra Printer Setup Utility Application.
- Tap on “Discover Printers”.
- Select the printer to connect Bluetooth to the Android device.
Note: If the printer fails to connect Bluetooth with the phone, press and hold the Feed button for 5 seconds until Bluetooth blinks up in the Zebra Printer.
- Now the Zebra Printer will be successfully connected via Bluetooth to the Android phone.
- Once the Zebra printer is connected to Bluetooth, the power button on the printer will turn green.
Step 3: To configure WiFi to Zebra Printer from an Android Phone
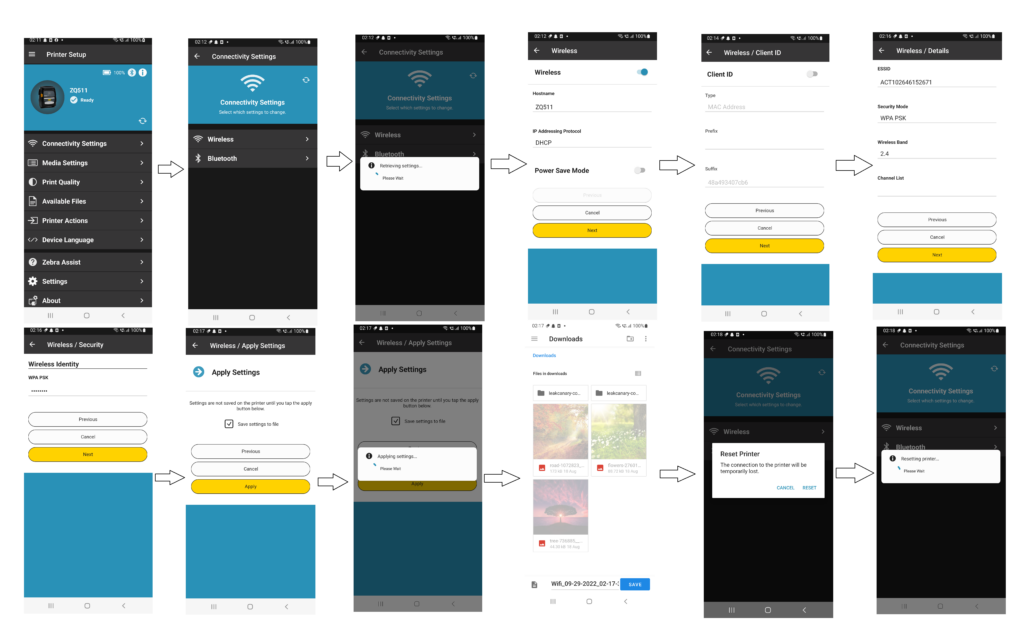
- Once the device is connected with Bluetooth, launch the Zebra Printer Setup Utility Application and tap on Connectivity Settings from the Printer Setup screen.
- Tap on Wireless from the Connectivity Settings screen.
- Once it retrieves the printer’s network settings, tap Next from the Wireless screen.
- Tap on Next from the Wireless/Client ID screen.
- Enter ESSID and Security Mode and tap on the Next button.
- Enter Password from the Wireless/Security screen. Tap on the Next button.
- Enable the Save settings to file checkbox and click on the Apply button.
- Click on the Save button to save the wifi configuration file to phone storage.
- Tap on the Restart button. Now the printer will reboot, and WiFi will start connecting to the Zebra Printer.

Need help? CONTACT US
Was this helpful?
YesNo
