
SureLock for Android offers the device to go complete kiosk. On some Android devices such as POS, public kiosks might not have any physical or navigation buttons to go back, home, or access recent applications. In such cases, SureLock has the solution for such conditions and that is floating buttons. Floating buttons are icons floating above the user interface on the screen.
Purpose
The purpose of this knowledge article is to provide a guide on how to use the navigation buttons when the device is in a complete kiosk.
Prerequisites
NA
Steps
- Launch the SureLock Application.
- Tap 5 times on the screen and enter the Admin Settings.
- Navigate to the SureLock Settings and further to the Floating Buttons Settings.
- In this section, select the floating buttons such as Back, Home, Recent, and Print buttons.
- Enable the check box against each button.
- Tap on the Button Icon to choose the icon.
- The Admin can even configure the button color and size under Floating Button Color and Floating Button Size options.
- Also, the icon can be made either a static icon to appear at the bottom of the screen or a dynamic one by checking the option Allow Relocation of Floating Buttons.
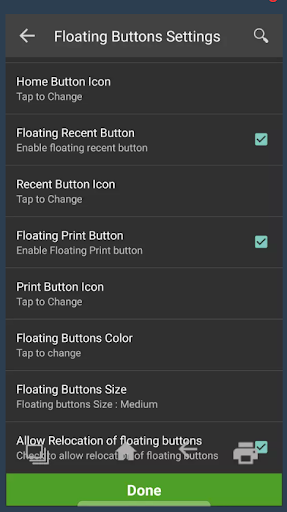
- Once all the configuration is done, click on Done and navigate back to the SureLock Kiosk home screen.

Need more help? Here’s how to get help from our experts.
Was this helpful?
YesNo