
With SureMDM’s Application Version Report available for all OS, it is quick and easy to view details of installed applications on all the enrolled devices.
Purpose
The purpose of this knowledge article is to provide a guide on how to view details of installed applications on multiple devices using SureMDM.
Prerequisites
NA
Steps
Step 1: To generate an app version report
1. Log in to the SureMDM Web Console.
2. Navigate to Reports.
3. Click the On-Demand Report option and select App Version.
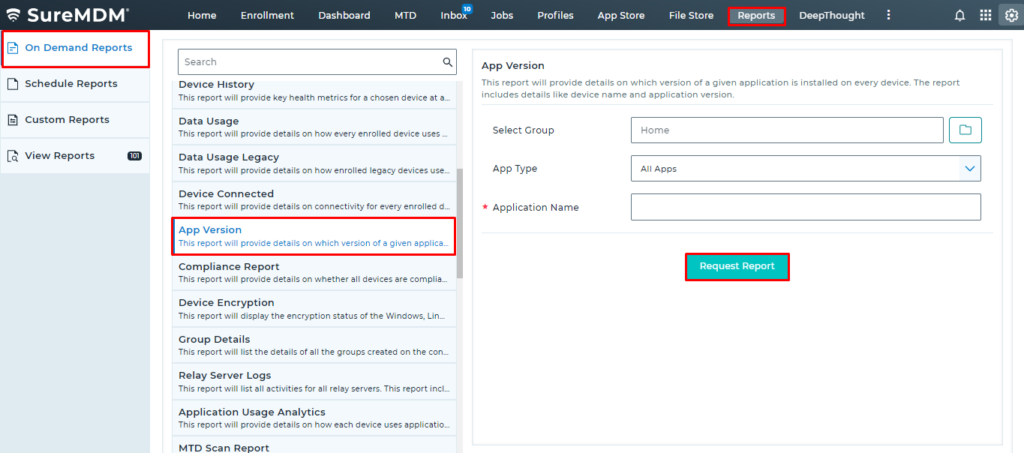
4. Select the below details.
a. Select Group: Click on the browse icon and select the group name from the group list.
b. App Type: Click on the drop-down icon and select the type of application for which the report is being generated.
c. Application Name: Enter the name of the application or package name of the application for which the report is being generated.
Note: You can enter names of multiple applications using commas.
5. Once done, click on the Request Report option. A prompt will appear asking the user to click on View Reports.

6. Now, navigate to the View Report section. Select the recently generated report with Report Name as App Version and select Download or View the report.
Based on the requirement, the user can also schedule the App Version report by clicking on the Schedule report options.
Step 2: To schedule the app version report
1. Log in to the SureMDM Web Console.
2. Navigate to Reports.
3. Click the Schedule Report option and select App Version. Click on the + icon in the app version screen to schedule the report.
4. Schedule New: The App Version Report screen will appear. Enter the below details.
a. Scheduled Report Cycle: Select the Daily, Weekly, or Monthly option based on the requirement.
b. Scheduled Cycle Time: The user can change the time at which the report is generated.
c. Mail To: Enter the Email ID to which the user wants the report sent.
d. Select Group: Click on the browse icon and select the group name from the group list.
e. App Type: Click on the drop-down icon and select the type of application for which the report is being generated.
f. Application Name: Enter the name of the application or package name of the application for which the report is being generated.
Note: You can enter the names of multiple applications using commas.

5. Once done, click on the Schedule option. The report will be added to the schedule list and the report will be generated at the scheduled time.
6. Users can also see the scheduled report under the View report section once the report is generated. Select Report Name as App Version and select Download or View the report.
Need help? CONTACT US