
App Plugins are software programs that customize the way platforms function or behave, and allow you to customize the user experience. The Group Assignment Wizard plugin helps bulk import Group Assignment Rules and automatically move devices to a specific group by allowing you to upload a CSV file with the Source Group, Destination Group and Device Properties.
For more information related to the plugins management, please refer to this article.
Purpose
The purpose of this knowledge article is to provide a guide on how to use the Group Assignment Wizard plug-in available on SureMDM.
Prerequisites
- SureMDM plugins are available only for Enterprise Subscription.
Steps
Step 1: Enable the Group Assignment Wizard Plugin in SureMDM
- Login to the SureMDM Console.
- Navigate to Settings and further to Account Settings.
- Select Plugins and then Manage Plugins.
- In Manage Plugins, select the Plugin Store tab.
- Select the Group Assignment Wizard plugin and click on Install Now.
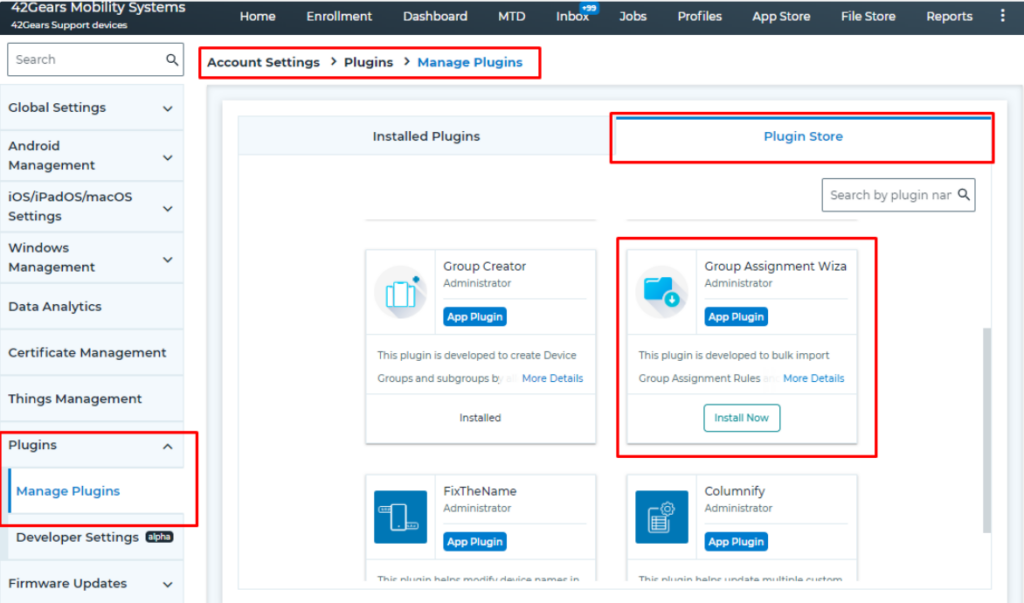
- Once the plugin is installed, click on the Installed Plugins tab.
- Search for the Group Assignment Wizard plugin and click Enable.
Step 2: Create a CSV file with group and device properties.
- Create a CSV file with each entry in the following format
- <EnableRule>, <RuleName>, <SourceGroupPath(s)>, <IncludeSubgroups>, <DestinationGroupPath>, <NumberOfConditions>, <Condition1>, <AND/OR>, <Condition2>, <AND/OR>, <Condition3>, <AND/OR>, …, <ConditionN>
- Enter as many conditions as required in the CSV file separated by the AND/OR operator.
Refer to the following table for the parameter values to be passed:
| Parameter | Value |
| EnableRule | Enter Y to enable the rule. Enter N to disable. |
| RuleName | Enter the rule name. |
| SourceGroupPath(s) | Enter the path of the source group(s), separated by semicolons.Example: Home; Home/Group1 |
| IncludeSubgroups | Enter Y to include subgroups. Enter N to exclude. |
| DestinationGroupPath | Enter the path of the destination group.Example: Home/Group2 |
| NumberOfConditions | Enter the total number of conditions in the rule. |
| ConditionN | Follow the below format to enter a condition (device property and values):<Device Property1> <Value Type2> <Values2> 1The supported values for Device Property are:1 – Local IP Address 2 – Global IP Address 3 – Device Model 4 – SSID For the custom columns, directly pass the name of the custom columns ( Only one rule with a custom column can be added, if the rule is already present disable or delete it to import a new rule) 2The supported Value Types & the format to enter the corresponding Values are:= <Value> IN (<Value1>;<Value2>;<Value3>;…..;<Valuen>) RANGE (<Minimum Value>;<Maximum Value>) |
| AND/OR | Enter the required operator (AND or OR) to link the conditions. |
A sample entry in the CSV file:

The above csv file would move the device with model iPhone 13 from Home/Group1 to Home/Group2.
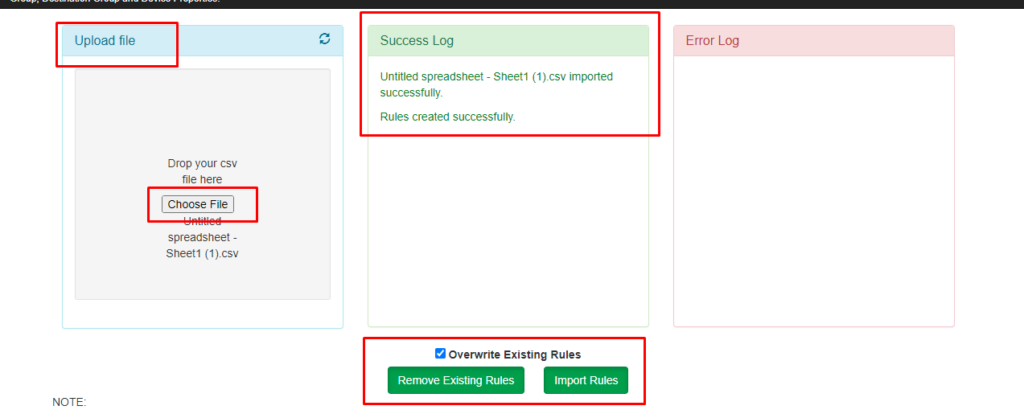
Step 3 : Execute the Group Assignment Wizard plugin to move the devices based on device properties created.
- Login to the SureMDM Console.
- Click on the MORE tab and choose Apps Plugin.
- Select the Group Assignment Wizard Plugin.
- Under upload file click on choose file and upload the CSV file created.
- Select the “Overwrite Existing Rules” option to overwrite any existing rule with the properties of the new rule specified in the CSV file, based on the matching Rule Name.
- Click on the “Remove Existing Rules” button to delete all existing Group Assignment Rules.
- Click on the “Import Rules” button to import the Group Assignment Rules.
- Do not close the tab when the screen is loading.
Note: Special characters supported are : ( ) [ ] ” ‘ @ – _{ } &.
Need more help? Here’s how to get help from our experts.